Tuesday, July 26, 2011
Lemon Pea Crostini on Sprouted Bread


Fresh peas from the pod take me back to my childhood as I recall being perched in the middle of a patch on my families farm picking and eating as I went. I'd lever the pod open to reveal the little green balls of sweetness inside, scoop them out and pop them in my mouth before moving onto the next, leaving a trail of pods as I went.
We were delighted to see them available at the farmers markets recently. We bought two bags and managed to crunch our way through one bag in a matter of hours. The boys love snacking on them and also love the challenge of getting the pod open. Making the mix for this recipe proved challenging as the peas kept disappearing into the mouths of two cheeky boys. Their little hands would sneak over the top of the kitchen bench, reach into the bowl and then run away dropping many as they went however I shan't complain about that!
I have used sprouted bread here. The thing about sprouting grains is that it activates food enzymes, increases the available vitamin content and neutralises anti nutrients like phytic acid that can bind up minerals preventing your body from absorbing them. You can read more about the benefits here. I really enjoy sprouted bread but appreciate it many not be for everyone. It has a nutty flavour that I like, but be aware it is very dense and heavy. A little goes a long way. You could easily use a good grainy sourdough in its place. Adjust the amount of lemon to your liking and season well. My preferred herb to use here would be dill but i had some basil in need of using so that found its way in there instead. Same applies to the lentils. Play around and use what you have on hand.

Smashed Lemon Pea Crostini on Sprouted Bread
Adapted from The Modern Vegetarian
Serves 2
1 garlic clove
2 tablespoons fresh basil
Pinch sea salt
150 g fresh peas (podded weight)
roughly 2 tablespoons cold pressed olive oil
100g feta cheese, crumbled
25g freshly grated paremesan
¼ cup green lentils, cooked (optional)
2 tablespoons lemon juice
Ground black pepper
4 slices of Essene Sprouted Bread by Pure Living Bakery
Rocket to garnish
Place the garlic and basil in a pestle and mortar along with a pinch of salt
Pound until crushed and transfer to a bowl
Working in batches, smash the peas in the pestle and mortar with a pinch of salt and a drizzle of olive oil until a rough paste is formed
Mix with the garlic and basil, feta and parmesan and dress with the lemon juice and another drizzle of olive oil
Slice 4 pieces of the bread and toast.
Top the bread with the smash pea and garnish with rocket
Season with ground black pepper if you wish

Tuesday, July 19, 2011
Exploring Buckwheat, Patties & Porridge


Exploring Buckwheat
It was a Saturday afternoon when I made these patties and I think in the back of my mind I was yearning for a casual Saturday evening meal like a burger. I had purchased some gorgeous field mushrooms from “get fresh” in cotton tree earlier that morning with no intention attached until i peered into the fridge that same afternoon. "I know I thought, I'll use the field mushrooms with the patties to substitute the roll". Its not like it hasn't been done before. I was happy with the outcome. The kids on the other hand weren't so sure. The mushrooms were a good medium size and whilst I could have eaten two (piggy I know) I resisted and opted for some black bean brownie instead of which I shall post soon.
As for patties, generally speaking all kinds feature regularly in our house. They are a great way to use up leftovers and the kids can handle them easily without to much mess. You just have to make sure you use enough ingredients to bind them together such as egg, breadcrumbs, rice, quinoa otherwise they fall apart and make mess, mess and more mess. I am always amazed by how much mess little people can make. Thinking ahead, patties work well in the lunchbox, as a snack or as an extra on the dinner plate.
About Buckwheat
For those unfamiliar with buckwheat please be aware that, despite its name, it is not related to wheat. Equally, it is not a grain but rather a pseudocereal and thus gluten free. Interestingly, it is related to the rhubarb and sorrel family. When shopping for buckwheat you have two options in the form of roasted buckwheat (kasha) or raw buckwheat groats which tend to be milder in their flavour. They are a great starting point. Buckwheat is versatile. For instance, I made three cups of cooked buckwheat when preparing for these patties with the intention in mind to make buckwheat porridge the following morning (1/2 cup cooked buckwheat, warmed rice milk, fruit and nuts, shredded coconut and a drizzle of maple syrup) and then for lunch at work the following day I used the remaining 1/2 cup as a base for roasted brocolli, hummus and tempeh. The cooked groats store well in the fridge and can also be frozen for up to 3 months in the freezer.
Cooking Buckwheat Is Easy:
1 cup buckwheat groats (yeilds approximately 3 cups cooked)
1 3/4 cups water
Bring water to boil in a medium saucepan over the stop top
Rinse the buckwheat kernels by placing them in a sieve and running tap water over them for 30 seconds
When water is boiling add the buckwheat to the water and reduce to a simmer
Place the lid on the saucepan and cook down for 15 mins
Grains benefit greatly from being allowed to steam in their pot after cooking. To do this remove them from the stove top after cooking and leave to rest for approximately 10 mins with the lid in place. Then fluff and serve or use as you wish.
I would recommend using cooled buckwheat for the patties but freshly cooked and steamed is delightful for porridge.
Buckwheat Burgers
Makes 12 medium sized patties
2 cups of buckwheat, cooked
½ cup almond meal
½ cup roasted sweet potato, diced
2 organic eggs, lightly beaten
2 generous tablespoons pesto (I used basil)
¼ cup parmesan, grated
¼ cup sage finely chopped
½ tsp salt
½ tsp pepper
Place all the ingredients into a bowl and mix well to combine
Take tablespoons full of mixture and shape into patties
Preheat a fry pan to a medium heat and lightly spray with oil
Cook the patties for about 8 mins on one side
Place a lid on the fry pan or a piece of foil over the top
Flip and cook the other side in the same way
Serve as you wish
To prepare the mushrooms:
Preheat a griddle pan to a med – hot setting
Remove the stem from the mushroom and brush both sides with olive oil
Place on the preheated pan and allow them to soften (approx 10 mins)
Cut thin slices of pear and brush with lemon juice
Place on the griddle pan and cook until caramelised
To assemble:
Place one field mushroon on a plate and top with buckwheat pattie, grilled pear and smoky tomato relish is you have it otherwise get creative with whatever you have on hand - maybe some honey wholegrain mustard or another dollop of pesto, hummus or natural yoghurt seasoned with salt and pepper. The options are endless. Add some greens as a side salad if you wish.
Wednesday, July 13, 2011
Gluten Free Heirloom Tomato Tart


I was delighted to discover some heirloom tomatoes at the Noosa Farmers Market when I recently visited. I purposely put them in the back of my car for the trip home to avoid eating them all. They were sweet and full of flavour. Once home, they were turned into a quick easy tart. Super easy and great for a late breakfast or light lunch. For a non gluten free version you could use 1-½ cups of plain wholemeal flour in place of the gluten free flours and omit the xantham gum.
Gluten Free Tart with Heirloom Tomatoes
Serves 4
For Pastry:
By La Tartine Gourmande
1/2 cup millet flour
1/2 cup brown rice flour
1/2 cup buckwheat flour
1.5 teaspoons xantham gum
0.5 teaspoon sea salt
7 tablespoons (100 g) cold butter, diced
1 egg
4 (or more as needed) tablespoons cold water
In the bowl of a food processor, combine the flours, xantham gum and salt
Add the butter and use the pulse option to work this mixture into crumbles
Add the egg and continue to pulse
Add the water, one tablespoon at a time and work until the dough detaches from the bowl
Transfer to a bowl and cover. Refrigerate for 1 to 2 hours.
Before rolling out allow the pastry to come back to room temperature
For Tart:
¾ cup ricotta cheese
salt and pepper to season
heirloom tomatoes (approximately dozen) sliced and let to rest of paper towel to absorb juices
greens to garnish
30 gms sheeps milk feta crumbled
egg beaten (for washing)
Preheat oven to 185 degrees celcius
Place the dough between two sheets of baking paper and roll out to a round shape approximately 30 cm in diameter
Gently lift the rustic pastry circle to the baking tray using the sheet of baking paper underneath
Season ricotta with salt and pepper to your liking
Spread fresh ricotta over the pastry base
Do not spread the ricotta right to the edge of the pastry instead leave approximately 5cm clear from the pastry edge
Place the slices of tomato over the ricotta overlapping them slightly as you go
Sprinkle crumbled sheep’s milk feta over the tart
Fold the edges of the pasty circle in to create a rustic looking free form pie
Season with freshly ground black pepper
Brush the folded over pasty edges with beaten egg
Place in oven and cook for approximately 30 minutes or until the base of tart is cooked through.
Serve with green salad

Sunday, July 10, 2011
Making Fresh Ricotta and Besan Crackers for a Snack


When I stumbled across this post recently on smitten kitchen I can honestly say I had a little flutter in my chest. Crazy I know but ricotta is a staple in our household. The boys love it and we cook with it regularly. It never goes to waste. Our local deli sells the most delicious, smooth and creamy ricotta and it sells out quickly. Luckily I am up with the delivery date and time so I generally don’t miss out – Phew!
To date I have had a couple of attempts at making ricotta and on both occasions have been left largely disappointed by the dry balls of cheese that looked at me. They tasted okay but they just lacked the creamy consistency i love.
Thankfully smitten kitchen was smart enough to come up with the thought to add some cream to the mix and voila! Creamy spreadable ricotta ready to go that is economical and tasty on freshly made besan (chickpea flour) crackers.

Fresh Homemade Ricotta:
Adapted from Smitten Kitchen
About 1 cup of Ricotta
3 cups whole milk
1 cup crème fraiche or cream
½ tsp sea salt
3 Tbs lemon juice
Place the milk, crème fraiche and salt into a medium size saucepan
Attach a milk or candy thermometer to the saucepan
Heat the milk to approximately 85 – 90 degrees Celsius (just before boiling)
Stir regularly to prevent scorching the bottom of the pan.
Take the pan off the heat and add the lemon juice
Stir very gently a couple of times before letting stand undisturbed for at least 5 minutes.
Meanwhile line a colander with cheesecloth and place it over a large bowl so the whey can drain away from the cheese
By this time your saucepan should have curds and whey in it that you can gently pour into the colander
Leave to strain for 1 hour then place in a glass jar in the fridge ready for use
Don’t dispose of your whey. Add to breakfast smoothies or you can actually make ricotta from the whey (my next mission). Alternatively skip on over to here for more ideas to consider.
Besan Crackers
Makes approx 12 crackers
½ cup besan flour
½ cup almond flour
3 tbs LSA
1 tbs cold press olive oil
¼ cup water
pinch salt and pepper
Preheat oven to 185 degrees celcius
Mix flours and LSA together (use a whisk to get rid of any lumps)
Add the oil and then gradually add the water
Mix until a dough forms (knead it on a bench if that makes it easier)
Place the dough between two sheets of baking paper and roll until thin
Cut cracker in squares with a knife or use a cookie cutter if you wish
Place on a tray line with baking paper
Bake in the oven for 15 – 20 mins or until lightly browned

Friday, July 8, 2011
On the Light Side + Aiming for Balance


A really light lunch today consisting of asparagus, grilled pear, toasted hazelnuts and fresh turmeric. Quite appropriate after an indulgent evening out with the girls inclusive of dessert, wine and lots of laughter. I still feel good thinking about it now. To bulk this up a little I suggest the addition of some protein such as a poached egg, feta or even cottage cheese however in sticking with the lighter option I went for a dollop of creme fraiche, a splash of lemon juice and a grind or two of cracked black pepper plus a herbal tea for comfort.
So are you thinking what is with the turmeric? Well I picked some up at the farmers markets last weekend and have been grating it over many things throughout the duration of the week. It has an unusual peppery type of flavour and stains your fingers and anything else it comes into contact with, but i like it. It possibly is not for everyone but I mostly love it for its medicinal properties which you can read about here if your wish.
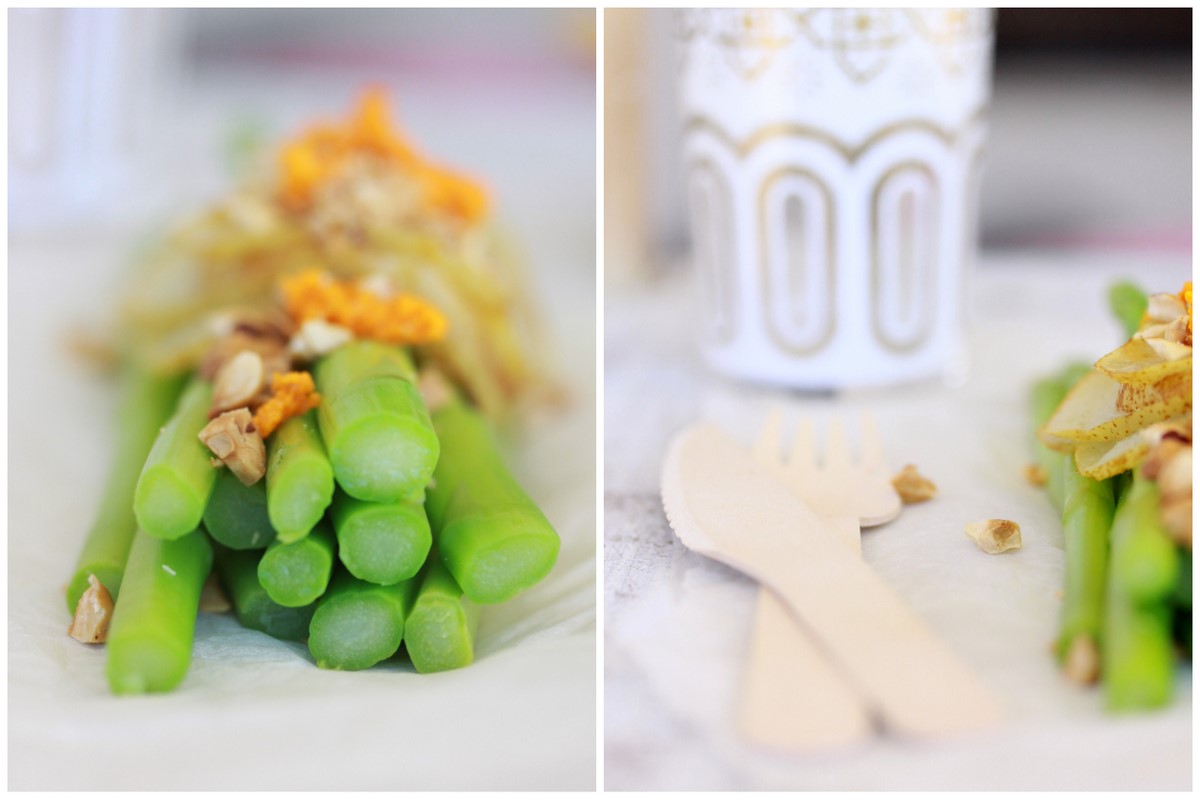
My Light Asparagus Salad
Serves 1
1 bunch of fresh asparagus (woody ends trimmed)
1/2 pear sliced thinly
Juice 1/2 lemon
5 hazelnuts toasted or plain roughly chopped
1 tsp grated turmeric
Dollop of natural yoghurt or creme fraiche
Ground black pepper
Bring a medium pot of water to the boil
Blanch the asparagus by putting it in the boiling water for 1 min then
remove from the boiling water and place in a bowl of iced water
Preheat a griddle pan to medium and grill the slices of pear until caramelised
Remove the asparagus from the iced water to drain
Chop the hazelnuts roughly
Grate the turmeric and assemble salad
Spoon leftover lemon juice over the salad and ground black pepper


Sunday, July 3, 2011
Quinoa, Grape and Roasted Garlic Salad
I enjoyed every mere morsel on this plate. When i eat amazing fresh food like this i realise just why i love food so much!


Quinoa and Grape Salad with Roasted Garlic
Adapted from Sunday Suppers
Serves 4 – 6 as a side
1 head of garlic
3 cups seedless red grapes (some whole & some on vine)
½ cup fresh mint
100gms sheeps milk feta crumbled
2 Tbs extra virgin olive oil
1 Tbs red wine vinegar
2 cups rocket or other your choice of salad leaves
salt and pepper to season
1 cup of cooked quinoa (to prepare see below)
Preheat the oven to 225 degrees celcius.
Slice the top of the garlic and spray/brush with olive oil
Place on baking sheet and roast until soft (approximately 20 – 30mins)
When done reduce the heat of the oven to 140 degrees celcius and arrange grapes on a baking sheet in a single layer
Bake until about half their size (about an hour and half)
Cool and begin to prepare the quinoa.
Quinoa:
Rinse ½ cup uncooked quinoa under the tap for 30 seconds
Bring 3/4 cup water to the boil
Add the rinsed quinoa to the boiling water
Reduce to a simmer and place the lid on the saucepan
Cook down for 10 - 12 mins or until water is absorbed and quinoa is fluffy
Turn the heat off and remove from the stovetop
Leave the lid in place until ready to use.
To assemble the salad:
Combine the quinoa, olive oil, vinegar, feta, smashed garlic cloves, mint leaves, loose grapes and rocket
Toss to combine and season to taste
Top salad with whole grapes on vine and serve

Subscribe to:
Posts
(Atom)

Flick The Guilt For Just $15 By Picking Up A Copy Of Guilt Free Desserts By Wholesome Cook Today. Did I Mention We Are Featured!
Sign Up for Some Goodness


Popular Posts
-
 For anyone interested in learning more about raw food then do take some time to stop by the website of Russell James . A pommy lad wi...
 -
 These little cupcakes constitute what I would regard a worthwhile indulgence and they are both grain and gluten free. Chocolate Co...
 -
 It’s fabulous fermentation week and personally it couldn’t have come at a better time. After reluctantly being prescribed and taking...
 -
 I seriously have no idea why I haven’t shared this considering we have been eating it all winter long. Soup is such a great thing to...
 -
 I can't take credit for this fabulous chocolate chia cake but Tania Hubbard can. The founder of Husk and Honey , Tania is sma...
 -
 My husband ventured out last evening to do a trial run for his up coming adventure race . He left late yesterday afternoon and arrived ho...
 -
 "Beans, you mean beans as in beans a colleague said" I made this batch of black bean bean brownies and took them to work for m...
 -
 Easter Sunday – what a glorious morning. If there could possibly be a positive to getting up at the crack of dawn with kids, the glorious...
 -
 I attempted to make my own Fillo Pastry by following the advice of Theo Kalogeracos. I was given his book sometime ago and i have made ...
 -
 I like to make a big batch of these and store them for future use. They are easy, versatile and store well for long periods of time. T...